

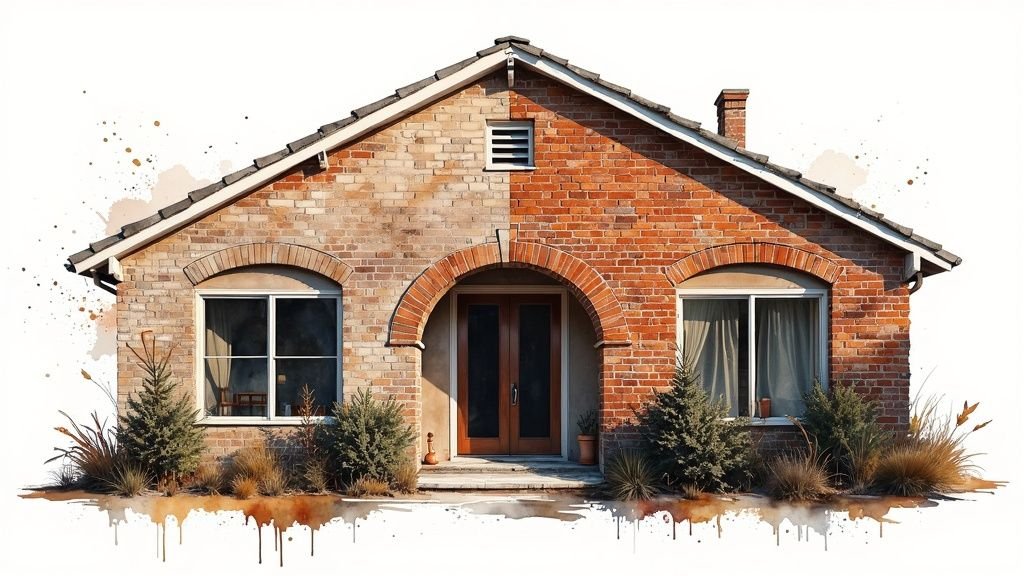
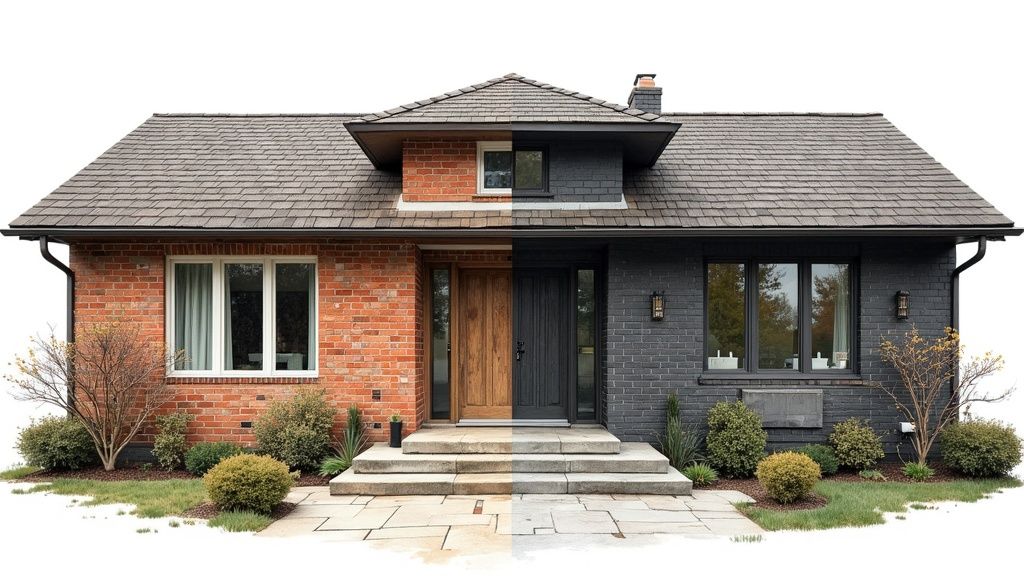
If you’re looking for the best way to give your home a serious facelift, staining the brick exterior is one of the most effective methods to achieve a dramatic transformation while honouring the material itself. It’s not like painting, which just coats the surface. Stain actually sinks into the pores of the brick, delivering a rich, durable colour that won’t chip or peel away. The staining brick before and after reveals are truly impressive, capable of turning a dated exterior into something fresh and modern, and we’re seeing this trend take hold across the GTA.
Why Staining Is the Best Choice for a Lasting Transformation
Here in Toronto and Mississauga, homeowners often weigh the pros and cons of staining versus painting their brick. While both change the colour, their long-term performance couldn’t be more different. An objective look shows that staining isn’t just a cosmetic touch-up; it creates a permanent chemical bond with the masonry.
That core difference is precisely why stain lasts so much longer. Paint forms a film over the brick, which can trap moisture. With the harsh freeze-thaw cycles we get in the GTA, this trapped moisture is a recipe for blistering and peeling. Brick stain, on the other hand, is breathable. It lets the brick function as it should, preventing moisture from getting stuck and causing damage down the road. This makes it the best choice for our local climate.
Key Benefits of Staining Your Brick
The advantages of staining are about more than just good looks; it’s an objective, smart investment in your home’s integrity and value. While we’re focused on staining here, many of the foundational principles of preparation are similar to painting, which you can learn about in this guide on how to paint brick walls for a lasting finish.
So, why do so many homeowners in the Toronto area choose stain? Here are the best reasons:
- Preserves Natural Texture: Stain seeps into the brick, highlighting its natural character instead of hiding it. Paint tends to mask those beautiful, subtle details under a thick, artificial-looking layer.
- Exceptional Durability: Since it becomes one with the brick, a professionally applied stain can last for 20 years or more before needing any attention.
- Zero Peeling or Chipping: This is a big one. Stain will never flake off like paint, which means your home continues to look sharp for decades with far less maintenance.
- Boosts Curb Appeal: The right shade can completely reinvent a home’s aesthetic, from a classic Mississauga bungalow to a century-old Toronto semi. If you’re looking for ideas, our guide on exterior paint color combinations can offer some great inspiration.
The objective is to get a deep, permanent colour that looks entirely natural—almost like the brick was fired in that shade from the very beginning. That’s the signature of the best quality staining job.
In the end, staining gives you the best of both worlds: a stunning visual upgrade and a protective finish that works in harmony with your brick, not against it.
Choosing the Right Stain Colour for Your GTA Home
Picking the right stain colour isn’t just a detail—it’s the decision that defines your entire project. The shade you choose sets the tone for your home’s exterior, directly impacting its curb appeal and architectural vibe. This is especially true across the diverse neighbourhoods of Toronto and Mississauga, where the perfect colour can modernize a classic bungalow or add warmth to a brand-new build.
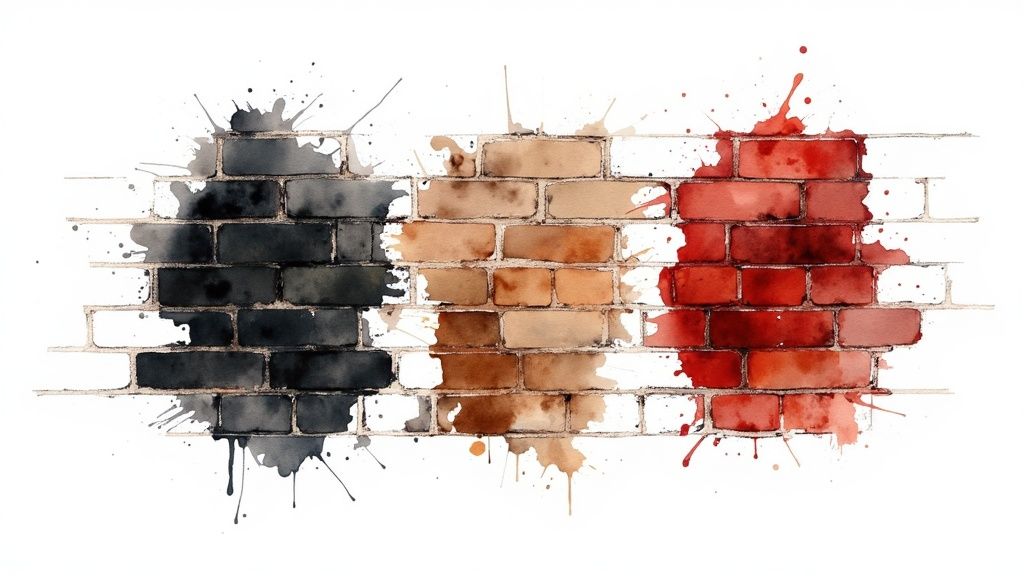
Before you even look at a colour swatch, take an objective look at your home’s permanent fixtures. Your roof, window trim, soffits, and even established landscaping create an existing palette you need to work with. The goal is to find a stain that complements these features, creating a cohesive and intentional look. For instance, a house with a charcoal-grey roof and black window frames is practically begging for a sophisticated, deep grey or even a clean, dramatic white stain.
Opaque vs. Semi-Transparent Stains
Just as important as the colour is the type of stain you use. The finish you choose will completely change the final look and feel of your staining brick before and after transformation.
- Semi-Transparent Stain: This is your go-to if you love the character of your brick but not the colour. It allows the natural texture and subtle colour variations to peek through, adding richness and depth without creating a flat, painted-on look. It’s perfect for enhancing old brick with a story to tell.
- Opaque (Solid) Stain: If you’re after a total transformation or need to hide inconsistencies like mismatched bricks or previous patch jobs, an opaque stain is the answer. It delivers a solid, uniform colour—similar to paint but with the crucial breathability that brick needs.
For a classic red brick home in Mississauga, a bold, opaque charcoal stain can deliver a stunning, high-contrast modern update. On the flip side, a warm, semi-transparent taupe can beautifully refresh a dated brown brick façade, enhancing its earthy tones without erasing its natural character.
Real-World Scenarios for GTA Homes
Think about a typical red brick semi-detached house in a Toronto neighbourhood. Staining that brick a deep, earthy brown can create a wonderfully warm and inviting feel, especially when paired with classic cream-coloured trim.
Another popular move we see is going with a light grey or greige. This instantly brightens an exterior and gives you a clean, neutral canvas to make your landscaping pop. The best way to be sure is to always test your top colour choices on a small, out-of-the-way spot first. This is the only way to see how the stain truly reacts with your brick’s unique colour and porosity before you commit to the whole house.
Getting Your Brick Ready for a Perfect Finish
If you want a brick stain that lasts, you can’t skip the prep work. This is where the real magic happens, long before you even open a can of stain. An objective inspection and thorough cleaning are what ensure the stain soaks in beautifully and evenly.
First things first, get up close and personal with your brick. Look for any hairline cracks in the mortar joints and that tell-tale chalky white residue, which is called efflorescence. You’ll want to fill any small gaps with a good-quality masonry caulk to create a seamless surface for the stain.
Before you start, make sure you have the right gear:
- Masonry caulk
- A sturdy wire brush
- Tuckpointing tools (if you have larger gaps to fix)
- Safety glasses, gloves, and a dust mask—brick dust is no joke.
The goal is to have a wall that’s completely dry and free of any surface salts before you even think about staining.
This whole process can be broken down into three main phases: inspect and repair, clean, and protect. Getting this sequence right is key.
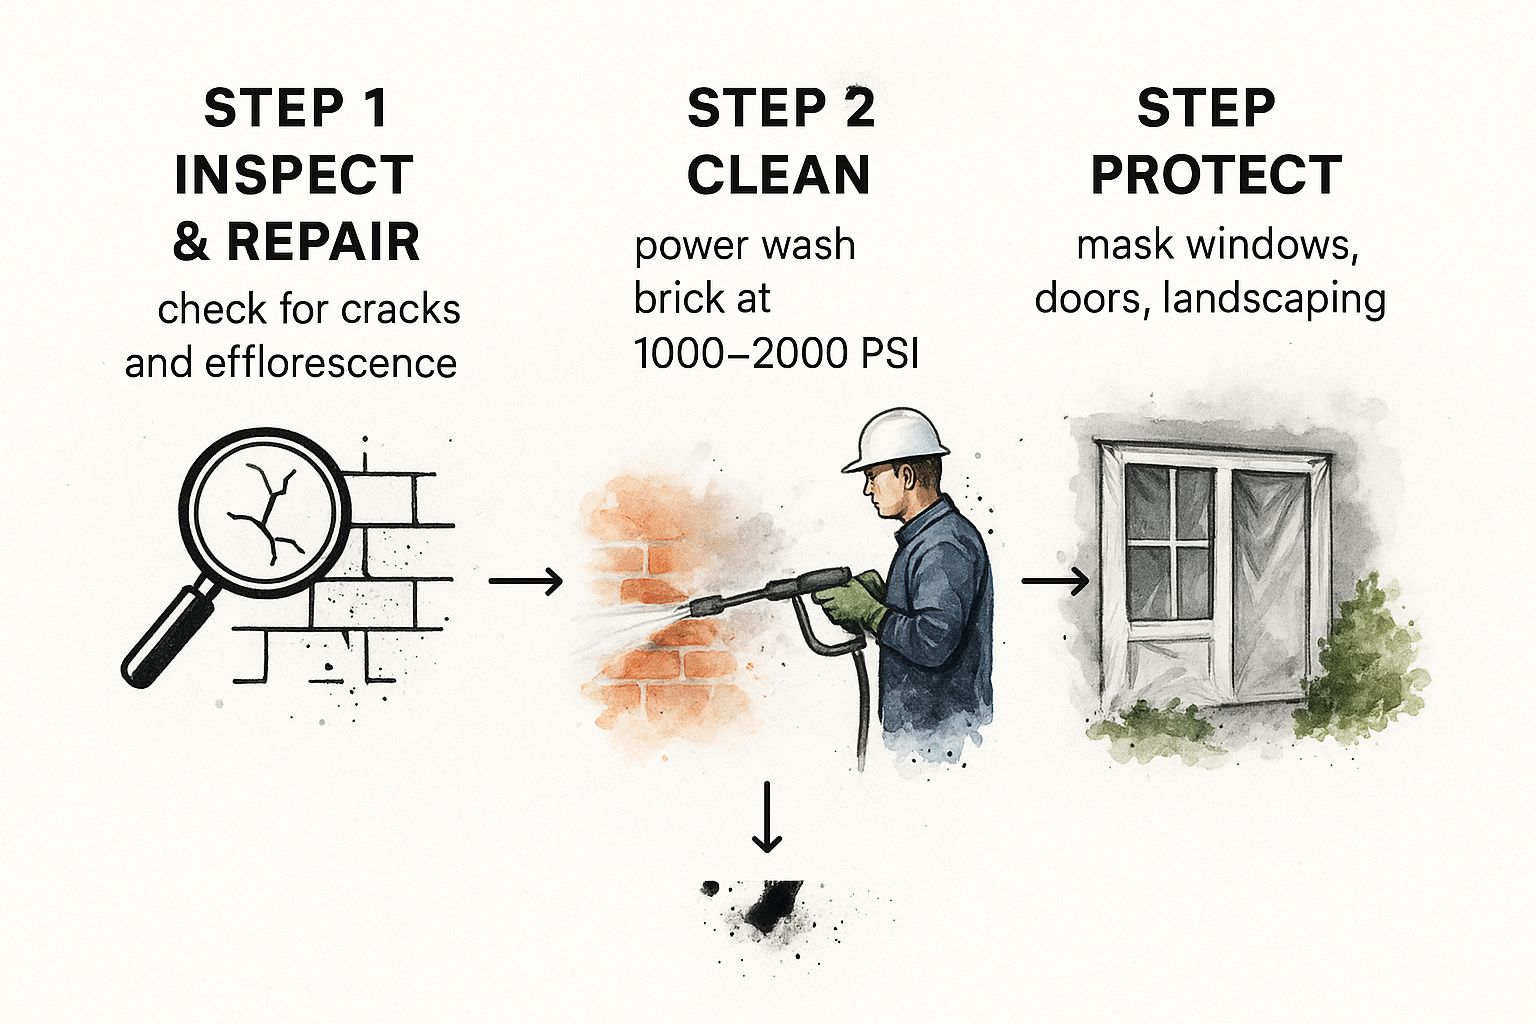
This graphic gives you a great visual roadmap, showing how each stage flows into the next.
Cleaning and Pressure Washing: The Right Way
Once your repairs are done and have had time to cure, it’s time to get rid of all that built-up grime. A power washer is your best friend here, but you have to use it correctly. I’ve found that a pressure setting between 1000–2000 PSI is the sweet spot—it’s strong enough to strip away years of dirt but gentle enough to not damage the mortar.
With the right pressure, you can see a massive difference, sometimes achieving a 73% reduction in surface debris. Always, and I mean always, test a small, inconspicuous area first. This helps you confirm the PSI isn’t going to erode the joints.
A rotating nozzle will give you the most even coverage. Hold the wand at about a 45-degree angle from the wall and move in steady, consistent sweeps to avoid leaving streaks behind. If you run into really stubborn stains, a mild detergent can help, but make sure you rinse every last bit of it off. Then, be patient and let the brick air dry for at least 24 hours.
Proper cleaning isn’t just about looks; it sets the foundation for how well the stain will adhere and how long it will last.
Protecting Your Surroundings is a Must
Masking off windows, doors, and landscaping isn’t just a suggestion—it’s non-negotiable. Any professional painter will tell you they spend a good chunk of time creating sharp, clean borders to prevent overspray. It’s a sign of quality work.
Drape drop cloths over any nearby plants, patios, or pathways. Use a high-quality painter’s tape rated for exterior use to tape around window and door frames.
For larger areas like glass panes, plastic sheeting is the way to go. You can secure the edges with spring clamps or a staple gun to keep it from flapping in the wind. When you think you’re done, take a walk around in the daylight to make sure you haven’t missed any spots.
While we’re talking about exterior finishes, it’s interesting to see how trends are evolving. Here in Ontario, we’re seeing more sustainable choices, and it’s a similar story elsewhere. For instance, in California’s coastal cities, brick staining has become incredibly popular. It preserves the natural texture and allows the masonry to “breathe,” which helps reduce moisture damage—a big plus in those climates.
And if you’re working on an interior project at the same time, the principles of good preparation still apply, even on different surfaces. For anyone tackling plaster or drywall, our guide on how to prep walls for painting offers some great parallel advice.
The Final Once-Over Before Staining
Just before you’re ready to start staining, do one last inspection. Walk the entire surface in natural light, looking for any leftover debris or repair marks you might have missed.
I highly recommend using a moisture meter. You’re looking for a reading below 20% to confirm the brick is dry enough for the stain to penetrate properly. If it’s too damp, the stain won’t take, and you’ll end up with a blotchy mess.
Give any lingering efflorescence a final scrub with a soft brush and double-check that any repairs have fully cured according to the manufacturer’s instructions.
If I could give one single piece of advice, it would be this: don’t rush. Delaying the staining until the brick is 100% dry and spotless will guarantee the best outcome.
With all these steps thoughtfully completed, your brick surface is now perfectly primed and ready for its transformation. This meticulous prep work is what truly maximises the impact of that dramatic before-and-after you’re hoping for.
Bringing Your Vision to Life: The Staining Process
With a clean and prepped surface ready to go, we can finally get to the exciting part—applying the stain. This is where all that hard work pays off and you start to see that dramatic staining brick before and after effect you’ve been waiting for. How you apply the stain makes all the difference, so let’s walk through the options to make sure you get that flawless, professional look.

Whether you’re updating a fireplace in Toronto or transforming a home’s exterior in Mississauga, the objective is the same: a rich, even colour that looks completely natural. To achieve this, you have three main techniques at your disposal: spraying, rolling, or brushing. Each has its own strengths, depending on your brick’s texture and the size of your project.
Choosing Your Application Method
Picking the right tool is more than just a matter of preference; it directly affects the quality and efficiency of your work. For example, a rough, highly textured brick wall will need a different approach than a smoother, more uniform surface. Often, the best results come from using a combination of methods.
Here’s a quick comparison to help you decide which approach is best for your specific situation.
Brick Staining Methods Compared
| Method | Best For | Pros | Cons |
|---|---|---|---|
| Spraying | Large, relatively smooth surfaces where speed and a perfectly even coat are top priorities. | Incredibly fast for big jobs. Delivers the most consistent, factory-like finish. | Requires extensive masking and prep to protect surrounding areas from overspray. There’s a definite learning curve to avoid drips. |
| Rolling | Flat or lightly textured brick walls. A great middle-ground option for DIYers. | Much faster than brushing and easier to control than a sprayer. Provides good, solid coverage. | May struggle to get into deep mortar joints or heavily textured spots. Can leave “lap marks” if your technique isn’t consistent. |
| Brushing | Highly textured, old, or very porous brick. Also essential for detailed work and “cutting in.” | Gives you maximum control and pushes the stain deep into every pore and mortar line. | Very slow and labour-intensive for large areas. Can look streaky if you don’t maintain a wet edge. |
Ultimately, many projects benefit from a hybrid approach—spraying or rolling the large, open areas and then using a brush for the detailed work around edges and trim.
Pro Tips for a Perfect Finish
Regardless of the tool you’re holding, your technique is what will set your project apart. You want the stain to become one with the brick, not just sit on top of it like a coat of paint. This is the key to getting that rich, durable colour you’re after.
One of the biggest mistakes I see is trying to get full coverage in a single, heavy coat. The best approach is applying a couple of thin, even coats. This allows the brick to absorb the stain properly, preventing runs and ensuring the colour is consistent from one end of the wall to the other.
Here are a few more tips from the field to guarantee a streak-free application:
- Work in small, manageable sections. Don’t try to tackle the whole wall at once. Focus on an area of about 4×4 feet at a time. This helps you maintain a “wet edge,” which is essential for blending each section into the next without leaving obvious lines.
- Always back-brush your work. After you spray or roll a section, immediately go over it lightly with a good-quality brush. This extra step is a game-changer. It works the stain into all the nooks and crannies and smooths out any potential drips for a truly uniform look.
- Don’t cheap out on your tools. A premium finish starts with premium equipment. For more on what makes a difference, our guide to selecting the right paint brushes and rollers has great advice that’s just as relevant for staining. Taking your time with the right technique and tools is what will make your home a standout in any GTA neighbourhood.
Finding the Best Brick Staining Services Near Me in Toronto
https://www.youtube.com/embed/B6PD_-aF_R4
While tackling a brick staining project yourself has its appeal, bringing in a professional is often the surest way to get those stunning staining brick before and after results you see in magazines. There’s just no substitute for years of hands-on experience when you want the best outcome.
A seasoned expert understands the nuances of different brick types, has access to professional-grade equipment, and knows exactly how to achieve a flawless, long-lasting finish. That expertise is what truly elevates a home’s curb appeal, but finding the best contractor near me requires a bit of homework. Your objective is to find a team that’s not just skilled, but also reliable and transparent.
What to Look for in a GTA Contractor
When you start looking for the best brick staining specialists in Toronto or Mississauga, zero in on their track record and their process. Any reputable company should be proud to show you a portfolio of their completed projects. Don’t just glance at it—ask to see examples of homes similar to yours and look closely at the details. Is the colour application consistent? Are the lines around windows and trim clean and sharp?
Beyond their past work, you need to get a feel for their methodology. This means asking direct, specific questions to see if they really know their stuff.
- What kind of stain do you recommend for my brick? Have them explain whether they use silicate-based mineral stains or acrylic-based products and, more importantly, why one is better for your home.
- Could you walk me through your prep process? A true professional won’t hesitate to detail their steps, from the initial inspection and repairs to power washing and meticulous masking.
- Are you fully insured and licensed? This is non-negotiable. Always confirm they have both liability insurance and WSIB coverage to protect you from any potential on-site accidents.
- Do you offer a written warranty? A contractor who is confident in their work will always stand behind it with a solid guarantee.
A contractor’s willingness to answer detailed questions is a strong indicator of their confidence and competence. If their answers are vague, it’s a significant red flag in your objective assessment.
Vetting and Making Your Final Decision
Once you have a shortlist of a few companies in the GTA, it’s time to do some digging. Check online reviews on sites like Google and HomeStars, looking for patterns in what past clients are saying. A single bad review isn’t necessarily a dealbreaker, but multiple complaints about poor communication or shoddy work should give you pause.
The demand for quality masonry work is high. In a large market like Toronto, you’ll find plenty of options, so take your time to vet them properly. Asking the right questions is key. To help with this, here’s a great resource on crucial questions to ask potential contractors.
Finally, make sure you get at least three detailed quotes in writing. Don’t just compare the bottom-line price. Objectively look at the scope of work outlined, the specific materials they plan to use, and the projected timeline. Making an informed choice now will ensure you hire the best company with confidence and love the results for years to come.
For homeowners thinking about more than just their brick, our overview of professional painting services in Toronto can give you a broader sense of what’s possible for your home’s exterior and interior.
Answering Your Top Questions About Staining Brick
Even after seeing stunning staining brick before and after photos, it’s natural to have questions. Committing to a project this big means you need real answers on everything from how long it lasts to what it costs. We hear these questions all the time from homeowners across the GTA, so let’s clear them up with some objective facts.
Budget is almost always the first thing people ask about. While every project is unique, looking at industry averages can give you a solid baseline. In many markets, brick staining runs between $1 and $4 per square foot. You can see some of the national cost averages for staining brick on homeadvisor.com. Here in the Toronto area, the range is similar, but the final price tag will always depend on things like the condition of your brick and how tricky the job is to access.
How Long Does Brick Stain Last Compared to Paint?
Here’s where stain really shines: its longevity. Paint sits on top of the brick, creating a surface layer that can—and will—eventually peel and chip. Stain, on the other hand, soaks right into the pores of the brick, forming a permanent chemical bond. It becomes part of the brick itself.
Because it doesn’t form a film, it won’t flake off. A professional staining job can easily look its best for 20 years or more with very little fading. Contrast that with paint, which often needs a complete redo every five to seven years, especially with our harsh Toronto freeze-thaw cycles making it look tired and worn.
Can I Stain Brick That Has Already Been Painted?
Technically, yes, but it’s a massive job. For stain to work, its objective is to penetrate the brick. If there’s a layer of paint in the way, it simply can’t bond. That means every last speck of old paint has to be stripped off first.
This isn’t a weekend DIY project. Paint removal usually requires chemical stripping or media blasting—jobs best left to professionals who can do it safely without gouging or damaging the brick underneath. This level of prep adds a lot of time and expense to the project. If you’re diving into any big surface prep job, it helps to know your coatings; our guide on what primer paint is used for has some good background info on surface prep.
A common mistake we see is people trying to stain over a poorly stripped, previously painted wall. The stain has nowhere to go, it won’t adhere properly, and you’re left with a finish that fails almost immediately. It’s a recipe for disappointment.
What Is the Average Cost to Stain a Brick House in the GTA?
For homeowners in Toronto, Mississauga, and the rest of the GTA, the best professional brick staining project typically lands somewhere between $2.50 and $5.00 per square foot. That price usually covers everything—labour, materials, and all the prep work.
So, for an average-sized house, you could be looking at a total cost anywhere from $4,000 to $8,000. The final quote will hinge on a few key factors:
- The total square footage of your home’s brick exterior.
- The current state of the brick and the mortar joints.
- The complexity of the architecture—think detailed trim work or hard-to-reach gables.
Our advice? Always get detailed estimates from at least three reputable local companies. It’s the only way to be sure you’re getting a fair price for a quality job.
Ready to see the best “before and after” transformation for your own home? The experts at Soca Services Painting have the skill and experience to deliver flawless, long-lasting results in Toronto, Mississauga, and across the GTA. Visit us online to schedule your free, no-obligation estimate today.


2 Comments