Table of Contents
-
Cost to Paint a House Interior: What Toronto Homeowners Should Budget
-
Interior Painting Preparation Steps and How Long the Project Takes
Last Updated: May 31, 2026
Choosing the right painter for your home is one of those decisions that feels simple until you’re standing in a paint aisle overwhelmed by finish options and contractor quotes that vary by hundreds of dollars. Residential painting services cover far more than rolling colour onto a wall, and understanding what’s actually included, what it costs, and how to vet a contractor will save you time, money, and a lot of frustration. At Soca Services Painting, we’ve spent over a decade working with Toronto homeowners, and this guide breaks down everything you need to know before you book a single appointment.
Here’s what most guides get wrong: they focus on the end result and skip the process entirely. The prep work, the paint selection, the contractor questions, the realistic timeline, all of that matters more than the final colour you choose. Below, we’ll walk you through each stage so you can make a confident, informed decision.
What Residential Painting Services Actually Include
Residential painting services are professional painting and surface finishing solutions applied to homes, covering interior walls, exterior siding, cabinetry, trim, ceilings, and specialty surfaces. A full-service painting company handles everything from surface preparation and drywall repair to colour consultation, application, and final cleanup.
Most homeowners assume painting means brushes and rollers. The reality is more layered.
A professional residential job typically includes:
-
Surface inspection and cleaning
-
Caulking gaps around trim and windows
-
Sanding rough patches and filling holes
-
Priming bare or stained surfaces
-
Applying paint in the specified number of coats
-
Protecting floors, furniture, and fixtures with drop cloths and tape
-
Final walkthrough and touch-ups
A professional painter in clean work clothes applying a smooth coat of white paint to a bright interior living room wall using a roller, with drop cloths protecting the hardwood floor and trim taped off neatly, warm afternoon light coming through large windows
The scope changes significantly depending on whether you’re painting a single bedroom or the full exterior of a two-storey home in North York. That’s why detailed project proposals matter. Before any work begins, a reputable contractor should give you a written breakdown of exactly what’s included.
Interior House Painting
Interior painting covers walls, ceilings, trim, doors, and specialty surfaces like accent walls or wainscotting. The most common projects Toronto homeowners request are full-room repaints, single accent walls, and ceiling refreshes after water damage repairs.
A common mistake is skipping the primer. If you’re switching from a dark colour to a lighter one, or painting over a surface that was previously wallpapered, primer is not optional. Skipping it almost always means uneven coverage and a second round of costs.
Interior house painters also handle drywall repair as part of the prep process. Small holes, nail pops, and hairline cracks should be filled and sanded before any paint goes on. If a contractor doesn’t mention surface prep during their estimate, that’s a red flag worth noting.
Exterior House Painting and Curb Appeal
Exterior painting is more technically demanding than interior work. Toronto’s climate, with its freeze-thaw cycles and humid summers, puts real stress on exterior finishes. A quality exterior paint job requires proper surface cleaning (often pressure washing), scraping loose paint, priming bare wood or metal, and applying paint rated for exterior exposure.
Curb appeal is a genuine factor in home value, and a fresh exterior finish is one of the fastest ways to improve it. Siding, trim, shutters, doors, and even deck staining all fall under exterior residential painting services.
According to the Appraisal Institute of Canada’s guidance on home improvements, exterior improvements consistently rank among the highest-return upgrades for resale value in urban markets like Toronto, Ontario.
Cabinet Painting and Refinishing
Cabinet painting is one of the most cost-effective home upgrades available. Instead of replacing kitchen or bathroom cabinets entirely, refinishing them with fresh paint or stain can transform the look of a room at a fraction of the cost.
The process requires more precision than wall painting. Doors and drawer fronts are typically removed, cleaned, lightly sanded, primed, and sprayed rather than brushed. Spray application produces a smoother, more durable finish without brush marks, which is why contractors who specialize in spray painting tend to deliver noticeably better results on cabinetry.
Commercial Painting Services
Many residential painting contractors also offer commercial painting services for offices, retail spaces, multi-unit buildings, and property management clients. The requirements differ: commercial projects often involve tighter timelines, off-hours scheduling to avoid disrupting business, and larger surface areas that benefit from spray application and dedicated project management.
If you manage rental properties in Toronto or Vaughan, working with a contractor experienced in both residential and commercial work means consistent quality across your entire portfolio.
Cost to Paint a House Interior: What Toronto Homeowners Should Budget
The cost to paint a house interior in Toronto depends on several factors: the size of the space, the number of coats required, the condition of the surfaces, and the type of paint specified. Most painting websites either refuse to publish prices or hide behind a ‘call for a quote’ button. This section does the opposite. The ranges below are grounded in what professional painting contractors in the Greater Toronto Area typically charge, and they are specific enough to use as a real planning tool.
Detailed Cost Breakdown by Square Footage
Painting costs are calculated against paintable wall surface area, not floor area. A 1,000 sq ft bungalow has considerably more paintable surface once you account for ceiling height, multiple rooms, trim, and doors. A useful rule of thumb: multiply your floor area by 2.5 to estimate total paintable wall and ceiling surface before adding trim.
Here is a realistic pricing reference for interior painting in Ontario, broken out by project type:
|
Project Type |
Typical Scope |
Estimated Cost Range (CAD) |
Key Cost Drivers |
|---|---|---|---|
|
Single room, standard |
Walls + ceiling, 1 colour |
$350 – $700 |
Ceiling height, patch repairs, colour change |
|
Single room, premium |
Walls, ceiling, trim, doors |
$600 – $1,100 |
Trim detail, number of coats, finish type |
|
Full main floor (open plan) |
All walls, trim, ceilings |
$1,800 – $3,500 |
Square footage, colour changes, prep condition |
|
Full interior (2-storey home) |
All rooms, trim, ceilings |
$4,500 – $9,000+ |
Number of rooms, stairwells, surface repairs |
|
Kitchen cabinets (spray finish) |
Doors, frames, drawer fronts |
$1,200 – $3,000 |
Number of doors, degreasing required, finish quality |
|
Exterior, standard detached home |
Siding, trim, doors, soffits |
$3,500 – $8,000 |
Stories, surface condition, wood vs. fibre cement |
|
Accent wall only |
Single feature wall |
$150 – $350 |
Wall size, texture, primer requirement |
Important context for these ranges:
-
Prices assume professional-grade paint (Sherwin-Williams, Benjamin Moore, or equivalent). Contractor-grade products cost less but typically require an additional coat.
-
Surface prep is included in these estimates. A job that requires significant drywall repair, wallpaper removal, or mould remediation will sit at the higher end or above the range.
-
Labour accounts for roughly 70-80% of a typical residential painting invoice. Materials make up the remainder.
-
HST is not included in the ranges above.
What Drives the Price Up (and What You Can Control)
Understanding the cost drivers gives you real leverage when reviewing contractor quotes.
Factors that increase cost:
-
Dramatic colour changes: Going from a deep charcoal to a bright white requires an extra coat of primer and often a third finish coat. Budget for it.
-
Ceiling height above 9 feet: Anything requiring scaffolding or extended-reach equipment adds labour time.
-
Surface condition: Homes with older drywall, previous DIY patching, or water staining require more prep hours.
-
Number of colours: Each colour transition, between walls, trim, and ceiling, adds masking and cut-in time.
-
Finish type on trim: Semi-gloss and gloss finishes on trim show every imperfection, so they require more careful sanding and priming.
Factors you can control to reduce cost:
-
Clear the room yourself before the crew arrives. Most contractors charge for furniture moving.
-
Choose a single neutral colour for the full space rather than multiple accent colours.
-
Address obvious surface repairs (small nail holes, minor cracks) yourself before the estimate walkthrough so they don’t inflate the prep line item.
-
Schedule during off-peak periods. Late fall and winter are slower for interior painting in Toronto, and some contractors offer better rates.
DIY vs. Professional Painting: An Honest Comparison
DIY painting is genuinely appealing. Paint is available at every hardware store, rollers and brushes are inexpensive, and the internet is full of tutorials. For a small, low-stakes project like a powder room or a single accent wall, DIY can work well.
The honest comparison looks like this:
DIY painting is reasonable when:
-
The surface is in good condition with no significant repairs needed
-
You’re using the same or a similar colour (no dramatic change)
-
You have time to do it properly over multiple days
-
The area is small and accessible
Professional painting makes more sense when:
-
The project involves multiple rooms or the full exterior
-
Surfaces need patching, caulking, or priming
-
You want a spray finish on cabinetry or trim
-
The property is being prepared for sale or rental
What most DIY guides miss is the hidden cost of materials at retail prices. A professional contractor buys paint at trade pricing, typically 20-30% below retail, and that discount partially offsets the labour cost on smaller projects. When you factor in the cost of rollers, brushes, tape, drop cloths, primer, and two cans of the wrong colour you bought before settling on the right one, the gap between DIY and professional narrows considerably.
The time cost is equally real. A proper two-coat interior paint job on a standard bedroom, done correctly with prep and cleanup, takes most non-professionals a full weekend. A professional crew completes the same job in a day. For a full main floor, that gap becomes a week of evenings versus two to three professional days.
Pro TipBefore booking any painter, use an online quote calculator to establish a baseline budget. It prevents sticker shock and gives you a reference point when comparing contractor quotes. When two quotes differ by more than 20%, ask each contractor to itemize labour, materials, and prep separately, the difference is almost always in what one contractor has excluded.
According to HomeAdvisor’s annual cost guide for painting services, homeowners who attempt large-scale DIY repaints frequently underestimate material costs and end up spending close to professional rates without the quality finish.
Interior Painting Preparation Steps and How Long the Project Takes
Interior painting preparation is the stage that determines whether the final result looks professional or amateurish. The paint itself is almost secondary to what happens before the first coat goes on.
Here’s the professional sequence for interior prep:
-
Clear and protect the space (move furniture, lay drop cloths, tape trim)
-
Inspect surfaces for holes, cracks, and water stains
-
Patch and fill damaged areas with joint compound or spackle
-
Sand patched areas smooth once dry
-
Clean walls to remove grease, dust, and residue
-
Apply primer to bare spots, stained areas, or dramatic colour changes
-
Allow primer to dry fully before painting
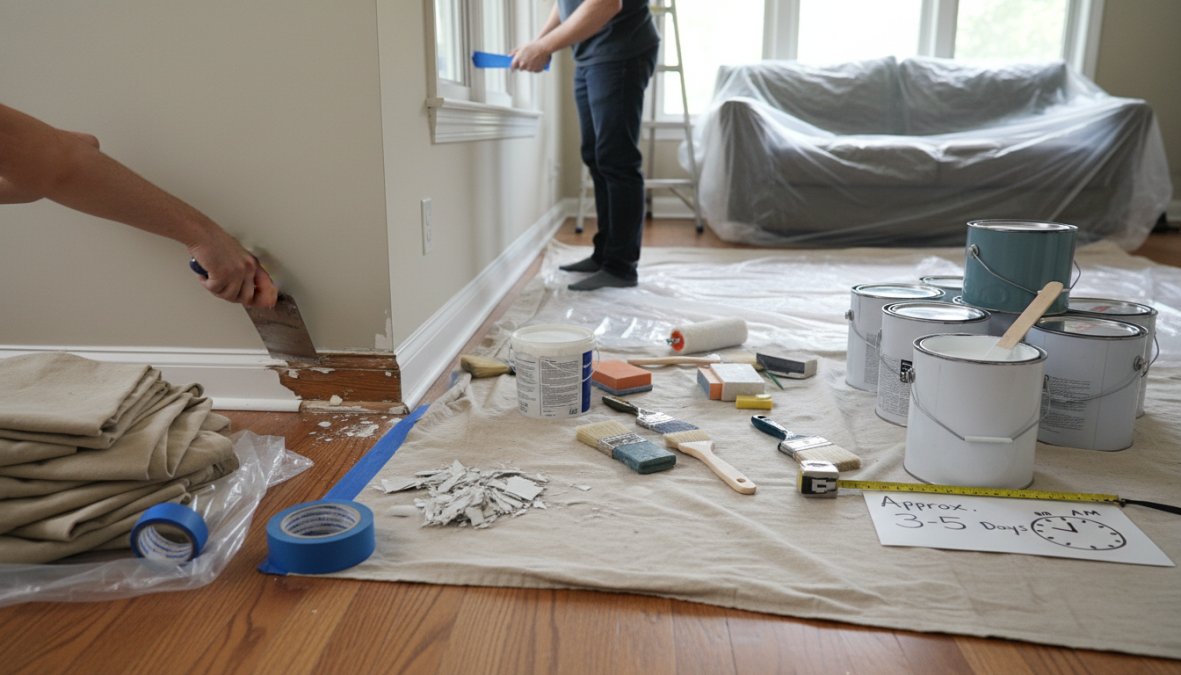
Close-up of a painter carefully applying blue painter’s tape along white baseboards and trim before painting, with paint cans, brushes, and surface prep materials arranged on a covered hardwood floor in a well-lit Toronto home
How long does interior painting take? A single room with standard prep typically takes one full day for a professional crew. A full main floor with multiple rooms, trim, and ceiling work runs two to three days. Exterior projects depend heavily on weather and surface condition but generally run three to five days for a standard Toronto home.
Watch OutSkipping the drying time between coats is the most common mistake that leads to peeling and uneven finish. Each coat, including primer, needs to cure fully before the next is applied. Rushing this step costs more to fix than it saves in time.
The Professional 4-Step Painting Process
A structured process is what separates a consistent, professional result from a rushed job. Soca Services Painting uses a clear four-step approach: detailed project consultation and proposal, thorough surface preparation, precise paint application (including spray techniques where appropriate), and a final walkthrough to confirm the result meets expectations.
Each step involves direct communication with the client. You should know what’s happening on your property at every stage, not find out after the fact.
Paint Type and Finish Selection Guide
Paint type and finish selection is an area where many homeowners feel lost, and understandably so. Here’s a plain-English breakdown:
Paint types:
-
Latex (water-based): The standard for most interior walls. Dries quickly, low odour, easy cleanup, and holds colour well over time.
-
Oil-based: Used for trim, doors, and high-traffic surfaces where durability matters more than drying speed. Less common now due to VOC content.
-
Primer: Not a finish coat. Primer seals surfaces and improves adhesion. Always use it on bare drywall, repaired patches, or dramatic colour changes.
Finish levels (from least to most sheen):
-
Flat/Matte: Best for ceilings and low-traffic walls. Hides imperfections well but harder to clean.
-
Eggshell: The most popular interior finish. Slight sheen, washable, works in living rooms and bedrooms.
-
Satin: Good for kitchens, bathrooms, and hallways. More durable and moisture-resistant.
-
Semi-gloss/Gloss: Best for trim, doors, and cabinets. Highly durable and easy to wipe down.
The Sherwin-Williams ColorSnap Visualizer and Benjamin Moore Color Portfolio are both free tools that let you preview colours on your actual walls using your phone camera before committing to a shade. Both are worth using during the planning stage.
Eco-Friendly and Low-VOC Paint Options
Low-VOC and zero-VOC paints have become the standard recommendation for interior residential projects, especially in homes with children, pets, or residents with respiratory sensitivities. VOC stands for volatile organic compounds, which are the chemicals responsible for the strong paint smell and associated health concerns.
Most major paint brands now offer low-VOC lines. Sherwin-Williams, Benjamin Moore, and other premium manufacturers produce interior paints with significantly reduced VOC content that perform comparably to traditional formulas. The tradeoff used to be durability, but that gap has largely closed.
For Toronto homeowners renovating before a sale or freshening up a rental unit in Vaughan or King City, low-VOC paints also reduce re-entry time after painting, meaning you can move back into a room sooner.
According to Health Canada’s guidance on indoor air quality and paint products, choosing low-VOC interior paints is among the recommended practices for maintaining healthy indoor air quality in residential spaces.
Key TakeawayFor most interior residential projects, a low-VOC latex paint in an eggshell or satin finish is the right default choice. It balances durability, washability, and indoor air quality without requiring specialized application.
How to Choose a Painting Contractor Near You in Toronto
Finding a reliable painting contractor near you in Toronto comes down to three things: verifiable credentials, transparent pricing, and clear communication before the job starts. The Toronto market has no shortage of painting companies, which makes the vetting process more important, not less. But the standard advice, ‘get three quotes and check reviews’, leaves out the specific evaluation steps that actually separate a contractor who will deliver a clean result from one who will leave you with peeling edges and unreturned calls.
Here is a practical, stage-by-stage framework for evaluating residential painting contractors in the GTA.
Stage 1: Baseline Qualification (Before You Invite Anyone to Your Home)
Before scheduling a walkthrough with any contractor, confirm these four things through their website, Google Business profile, or a brief phone call:
1. Liability insurance and WSIB coverage In Ontario, any contractor working in your home should carry general liability insurance (minimum $2 million is standard for residential work) and be registered with the Workplace Safety and Insurance Board (WSIB) or carry private workplace insurance. Ask for a certificate of insurance, not just a verbal confirmation. A legitimate contractor will email it without hesitation. If they push back, move on.
2. A physical business presence A contractor with a registered business name, a consistent address, and an established Google Business profile with reviews spanning more than one calendar year is meaningfully lower risk than an individual operating under a personal name with a new profile. This is not about size, small crews can be excellent, it is about accountability and traceability.
3. Verifiable reviews with response patterns Look at how a contractor responds to negative reviews, not just how many five-star reviews they have. A company that professionally addresses a complaint tells you more about their communication style than ten glowing reviews. On Google, filter for reviews that mention specific project types (exterior, cabinets, full interior) rather than generic praise.
4. Specialization alignment Not every painting company is equally skilled at every project type. A contractor who primarily does commercial repaint work on rental units may not have the spray equipment or finish precision for kitchen cabinet refinishing. Ask directly: ‘What percentage of your residential work involves projects like mine?’
Stage 2: The Estimate Walkthrough
The in-person or video walkthrough is where you learn the most about a contractor, not from what they say, but from what they ask and notice.
A contractor who is paying attention will:
-
Look at the surface condition before quoting, not just measure the room
-
Ask about the existing paint (latex vs. oil-based matters for adhesion)
-
Note ceiling height, stairwells, and any areas requiring special access
-
Ask whether you have a colour selected or need consultation
-
Identify any obvious repairs (cracks, water stains, peeling) and explain how they factor into the quote
A contractor who measures the room, nods, and sends a one-line quote within the hour has not priced your job, they have guessed at it.
The written proposal should include, as separate line items:
-
Surface preparation (hours or scope described in plain language)
-
Primer (specified as included or excluded, with reason)
-
Number of finish coats
-
Paint brand and product line specified
-
Areas explicitly excluded from the scope
-
Payment schedule and terms
-
Workmanship warranty duration and what it covers
If any of these are missing, ask for them in writing before signing. Verbal agreements about what’s included are the source of most post-project disputes.
Stage 3: Comparing Quotes Without Getting Misled
Price comparison only works when you are comparing equivalent scopes. A quote that comes in 30% lower than two others is not automatically a better deal, it is almost always a signal that something has been excluded.
The most common exclusions in low-ball quotes:
-
Primer (listed as ‘available at additional cost’)
-
Trim and doors (quoted as walls only)
-
Patch repairs (listed as ‘minor touch-ups only’)
-
Second finish coat (quoted as single-coat application)
-
Cleanup and furniture return
When comparing quotes, build a simple side-by-side: list each line item from your most detailed quote and check whether the other quotes include or exclude it. The true cost difference between contractors is usually much smaller than the headline numbers suggest once scope is equalized.
Watch OutBe cautious of any contractor who requests more than a 10-15% deposit before work begins. In Ontario, it is reasonable for a contractor to request a deposit to secure your booking date and cover initial material costs, but a demand for 50% or full payment upfront before a single drop cloth is laid is a significant red flag.
Stage 4: Communication as a Quality Signal
How a contractor communicates during the quoting process is a reliable preview of how they will communicate during the job. Specific things to note:
-
Do they respond to messages within a reasonable window (same business day for calls, 24 hours for emails)?
-
Do they explain their process in plain language, or deflect with vague reassurances?
-
Do they proactively mention potential complications (weather delays for exterior work, drying time between coats), or do you have to ask?
-
Do they confirm the project scope in writing before starting, or rely on verbal agreements?
A contractor who is difficult to reach before you’ve paid them will not become easier to reach once the job is underway.
Why Hire Professional Painters: Key Benefits
Hiring professional painters delivers results that most homeowners genuinely cannot replicate on their own, not because painting is impossibly difficult, but because the equipment, technique, and experience gap is real.
The key benefits of working with professional house painters:
-
Surface preparation expertise: Professionals identify and fix issues (cracks, moisture damage, adhesion problems) that untrained eyes miss.
-
Spray application capability: Spray painting cabinets, trim, and large surfaces produces a factory-smooth finish that brushes and rollers cannot match.
-
Workmanship warranty: Reputable contractors stand behind their work. A workmanship warranty means if something fails prematurely, it gets fixed.
-
Project management: A professional crew coordinates materials, schedules, and cleanup. You don’t spend your weekend managing the process.
-
Colour consultation: Many painting companies offer colour consultation support, helping you choose finishes that work together across rooms.
-
Time efficiency: What takes a homeowner a full weekend takes a professional crew a day.
-
Trade pricing on materials: Professional contractors purchase paint at trade pricing, which partially offsets labour costs and means better-quality products are used without inflating your budget.
Soca Services Painting holds a 5.0 rating based on 28 client reviews, which reflects what consistent communication and a structured process actually produce in practice.
Red Flags to Avoid and Questions to Ask
The painting contractor market in Toronto includes excellent companies and some that cut corners. Here’s how to tell the difference before you sign anything.
Red flags:
-
No written estimate or contract
-
Requesting full payment upfront before work begins
-
Vague answers about what’s included in surface preparation
-
No proof of insurance or WSIB coverage
-
Unusually low quotes with no explanation of what’s excluded
-
No fixed business address or verifiable business registration
-
Pressure to book immediately to ‘lock in a rate’
Questions worth asking every contractor:
-
What does your surface preparation process include, specifically?
-
Do you use premium paints or standard-grade products, and which brand will you use on my project?
-
Is primer included in the quote, and under what conditions would you skip it?
-
What does your workmanship warranty cover, and for how long?
-
Who will be on-site doing the work, your own employees or subcontractors?
-
How do you handle a situation where additional repairs are discovered once work begins?
The Instant Quote Calculator on the Soca Services Painting website is a practical first step before any contractor conversation. It gives you a realistic cost baseline so you can evaluate quotes with context, not just hope the numbers sound reasonable.
Conclusion: Your Next Step Toward a Fresher Home
Most homeowners delay painting projects because the process feels opaque: unclear costs, uncertain timelines, and too many decisions to make without a clear starting point. The solution is straightforward. Use the Instant Quote Calculator on the Soca Services Painting website to get a realistic estimate for your specific project, whether that’s a single room refresh, a full interior repaint, cabinet refinishing, or exterior work across your Toronto property. Soca Services Painting brings over a decade of experience, a structured four-step process, and a commitment to detailed project proposals that take the guesswork out of the entire experience. Get your free estimate today and take the first concrete step toward a brighter, fresher home.
Frequently Asked Questions
How much do residential painting services typically cost in Toronto?
Costs for residential painting services in Toronto vary based on square footage, surface condition, and the type of work involved. Interior painting for an average-sized room can range from a few hundred to over a thousand dollars depending on prep work, number of coats, and paint quality chosen. The best way to get an accurate number for your specific project is to use the Soca Services Painting Instant Quote Calculator on their website before booking an in-home estimate.
How long does a professional interior painting project take?
How long interior painting takes depends on the size of the space, the number of rooms, and the amount of surface preparation required. A single room may take one to two days, while a full home interior can take several days to a week. Factors like drywall repair, wallpaper removal, or multiple coats of paint can extend the timeline. A professional painting contractor will provide a clear project schedule during the estimate phase so you know exactly what to expect.
What should I look for when hiring a professional painting contractor?
When choosing a painting contractor, look for a company that is licensed and insured, offers a written estimate with clear scope of work, uses premium paints, and backs their work with a workmanship warranty. Ask about their surface preparation process, whether they handle drywall repair and caulking, and how they protect your furniture and floors. Reading verified customer reviews and checking their portfolio of past residential painting projects will help you make a confident decision.
Is it better to paint my home myself or hire professional painters?
DIY painting can save money upfront, but professional painters deliver a flawless finish faster, with proper surface preparation, better tools like spray equipment, and the experience to avoid costly mistakes. Hidden costs of DIY — such as equipment rental, wasted paint, and time — often close the price gap. For large projects, complex surfaces, or when quality matters, hiring professional painters is almost always the better investment for lasting results and peace of mind.
Do residential painting services include drywall repair and surface prep?
Yes, reputable residential painting services typically include surface preparation as a core part of the process. This covers caulking gaps, filling nail holes, sanding rough areas, and minor drywall repair before any paint is applied. Proper prep is what separates a professional, long-lasting finish from a paint job that chips and peels within a year. Always confirm what prep work is included when reviewing your painting estimate so there are no surprises on project day.
How do I choose the right paint finish for my rooms?
Paint finishes range from flat and matte to eggshell, satin, semi-gloss, and high-gloss. Flat finishes hide imperfections well and suit ceilings and low-traffic areas. Eggshell and satin are popular for living rooms and bedrooms because they're easy to clean. Semi-gloss and high-gloss work best on trim, molding, cabinets, and bathrooms where moisture resistance matters. A professional painting contractor can guide you through color consultation and finish selection to match your lifestyle and the function of each room.