You're standing in front of a tired six-panel door, noticing the scuffs around the handle, the yellowed colour near the trim, and the peeling edge that someone painted over during a rushed weekend project. The frustrating part is that the door may look fine when the work is finished, then begin sticking, marking, or peeling within months.
A durable result comes from treating the door as a small piece of furniture, not as an extension of the wall. The right preparation, compatible primer, controlled film thickness, suitable sheen, and proper cure time all matter. This guide explains how to paint interior doors with the practical approach used on Toronto-area jobs, while also helping you decide whether repainting is sensible or whether the door itself needs replacement.
Why a Great Door Finish Starts Before the Brush
A flawless door finish is decided before paint is opened. On a typical older Toronto home, the slab may carry hand oils, cleaning residue, old alkyd paint, small dents, and several previous touch-ups. A fresh coat applied over that surface can look attractive briefly, but it won't bond reliably to gloss, grease, or loose layers.
The reliable sequence is simple in principle: inspect, clean, degloss, repair, remove dust, prime where required, and then apply thin, even coats. Environmental conditions also matter. Winter heating dries the air, while summer humidity and air conditioning change how quickly water-based coatings level and cure. A thick coat applied in a closed room can remain soft long after it feels dry.
Practical rule: Door painting is roughly 70% preparation and 30% coating. If the first part is rushed, better paint won't rescue the finish.
Material compatibility deserves attention too. A latex topcoat over a glossy or oil-based surface needs a suitable bonding primer, while raw wood may need stain blocking. Lacquered, veneered, fibreglass, and steel doors each present different adhesion challenges. Before choosing a method, review this practical guide to surface preparation for painting in Toronto.
Homeowners comparing door styles or replacement options can also review doors for Fresno contractors and builders for a useful reference on door construction and product categories. The location differs, but the distinction between a repairable slab, a prehung unit, and a damaged assembly is still useful when planning the job.
Shortcuts usually cost more in recoats. A painter may save time by skipping deglossing or sanding, but that saving disappears when the new finish lifts at the latch edge or shows every old scratch through the topcoat. A factory-smooth appearance comes from controlling the surface, the room, and the coating system together.
Decide Whether to Repaint or Replace First
The first question isn't which colour to buy. It's whether the existing door is structurally worth keeping.
A solid-core door with intact rails, no warping, and stable hardware is usually a strong repaint candidate. Filling dents, sanding the surface, priming, and applying a trim enamel can restore it without disturbing the frame. A door with water damage, swollen fibreboard, delaminated veneer, or a persistently failing coating may be a poor use of labour because the substrate will continue to move or reject new paint.
Repair makes particular sense in Toronto bungalows and century homes, where original panel profiles can contribute character that a new flat replacement won't reproduce. Property managers also benefit from assessing the slab first, because a sound door can often be renewed while a damaged one needs a wider opening and hardware plan.
Maintenance expenses have also become more important. Statistics Canada reports that homeowners' maintenance and repairs prices increased by 19.2% from September 2018 to September 2024 (Statistics Canada, maintenance and repairs price information). That makes a careful repaint-versus-replace decision more valuable, especially when several doors need attention.
| Factor | Repaint | Replace |
|---|---|---|
| Door slab | Suitable when it's straight, solid, and intact | Necessary when it's warped, swollen, or structurally damaged |
| Surface | Works when scratches, dents, and old coatings can be prepared | Better when veneer has separated or damage keeps returning |
| Character | Preserves original panels and proportions | May change the look of an older home |
| Installation | Keeps the existing frame and hardware layout | Can involve sizing, fitting, casing, and hardware adjustments |
| Best fit | Cosmetic refresh and sound maintenance | Water damage, severe delamination, or repeated substrate failure |
For a broader repair-versus-replacement comparison, the guidance on cabinet painting versus replacing costs offers a useful way to think about labour, substrate condition, and long-term value. The same principle applies to doors. Don't repaint a failure source, but don't replace a sound door because its finish looks tired.
Setting Up Your Workspace and Removing Hardware
A door painted flat on a stable surface is easier to inspect, easier to sand, and less likely to collect drips than one painted in place. Set up a pair of sawhorses or a sturdy workbench in a well-ventilated, dust-free area, then cover the supports with smooth protective material. A canvas drop cloth protects the floor and gives you a safer footing than loose plastic.
Before lifting the door, photograph the hinges and hardware. Drive a nail upward through the lower edge of the top hinge pin with a screwdriver and hammer, then work the pin free. Support the door as you remove the remaining pins, especially with a heavy solid-core slab. Two people should handle a door that feels awkward or unstable.
Use labelled bags or containers for each hinge leaf and its screws. Hinges can look identical but still have different wear patterns, and mixing hardware creates unnecessary alignment problems during reassembly.
Remove the parts that get in the way
Take off the doorknob, latch, strike plate, and any other removable hardware. Painting around a knob usually leaves a rough edge and makes cleaning difficult. If you're keeping hinges in place, mask them carefully. Remove them completely if they'll receive a separate coating.
Mark the top edge and hinge side with low-tack tape before moving the slab. That small note prevents confusion when both faces look similar after sanding.
Build in curing time
Plan the work around the door, not just the painting session. The written setup should allow 24 to 48 hours of cure time between coats when the product and conditions require it. A door can feel dry but still mark against a sawhorse, another door, or weather stripping.
Keep the work area ventilated without blowing dust across the wet surface. Long, uninterrupted strokes are much easier when the slab lies level, and the painter can rotate it safely rather than reaching around hardware or balancing a brush over the floor.
Cleaning, Sanding, and Repairing the Surface
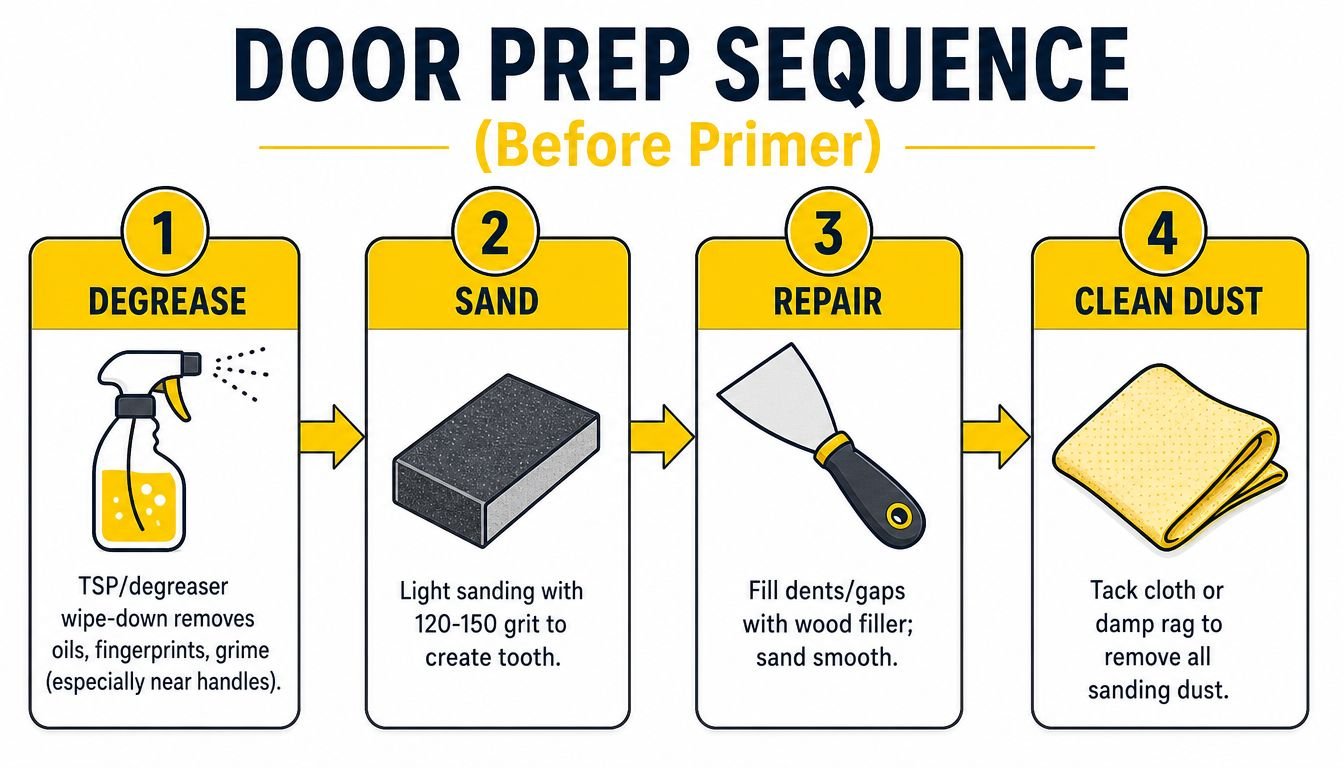
Clean the entire door before sanding. A TSP solution or suitable degreaser removes oils, fingerprints, and grime, with special attention around the handle and latch edge. Fresh paint can form small craters or fisheyes over residue, so a surface that looks merely dusty may still need thorough cleaning.
Let the door dry, then sand according to the condition of the substrate. Canadian door-refinishing guidance recommends a two-stage approach, beginning around 100 to 150 grit and following with 180 to 220 grit for a smoother finish (Canadian sanding guidance for door refinishing). For a practical site sequence, use 120 grit to break existing gloss, 150 grit to smooth bare wood, and 220 grit to refine filled areas.
Repair without softening the profile
Use lightweight spackle for small dents in painted surfaces. For deep damage, routed edges, or split areas on a wood panel door, a two-part wood filler provides a more suitable repair. Press the filler into the defect, allow it to harden fully, then sand it flush with a foam sanding block.
Don't flatten the surrounding moulding while chasing a repair. Work with the profile, using controlled strokes that preserve the crisp line between the panel and rail. Scratches left by coarse sanding can telegraph through satin or semi-gloss enamel, especially under side lighting.
If the door has old varnish or a heavy finish, review this resource on how to remove yellowed varnish from wood before choosing a coating strategy. For more guidance on using remover safely, see paint remover on wood.
Finish by vacuuming carefully, wiping with a tack cloth, and making a final pass with a damp microfiber cloth. Primer won't stick to sanding dust. Let the surface dry completely before applying it.
Priming Doors for Lasting Adhesion
Primer is the adhesion bridge between the door and the finish coat. It also helps even out porosity, suppress stains, and prevent a new light colour from exposing an old dark or yellowed surface.
Choose the product according to the substrate rather than the label alone. Raw wood and tannin-heavy species such as oak may need stain-blocking shellac or oil-based primer. A previously painted door in reasonable condition can often use a bonding latex primer after thorough cleaning and deglossing. Fibreglass and steel need primers specifically rated for those materials.
| Door Material | Recommended Primer | Notes |
|---|---|---|
| Raw wood or oak | Stain-blocking shellac or oil-based primer | Helps control tannin and uneven absorption |
| Previously painted surface | Bonding latex primer | Use after cleaning and scuff-sanding |
| Fibreglass | Dedicated fibreglass or plastic-compatible primer | Confirm compatibility with the topcoat |
| Steel | Metal primer suited to the substrate | Address rust or exposed metal before finishing |
| Sound pre-primed slab | Compatible enamel, with spot priming where needed | Inspect for contamination, damage, and exposed areas |
Low-VOC and zero-VOC products are available in Canadian door and trim lines. One Canadian door and trim product is specifically listed as low VOC and intended for doors, trim, and cabinets (Dulux Break-Through product information). In California, regulated architectural-coating categories use benchmarks such as 50 g/L for flat coatings, 100 g/L for non-flat coatings, and 150 g/L for non-flat high-gloss coatings, with many products described as low VOC under 50 g/L and zero VOC under 5 g/L (Sherwin-Williams CARB coating guidance). Those categories reinforce the practical habit of checking the product data sheet instead of relying on marketing language.
Apply primer evenly
Cut the mouldings with a tapered synthetic brush, then roll the flat faces with a 10 mm nap roller. Keep the coat even and avoid leaving heavy ridges at panel borders. Canadian product sheets show that recoat times vary by formula, with examples ranging from 1 to 4 hours at 25°C and 50% relative humidity, while some oil-based primers need about 2 hours under those conditions (Canadian primer product information).
Cooler temperatures, higher humidity, and thick application extend drying. A properly primed door should show a uniform sheen, no flashing, and a surface that accepts the topcoat without soaking it in. For a plain-language explanation of primer's role, see what primer paint is used for.
Paint Selection and Application Technique
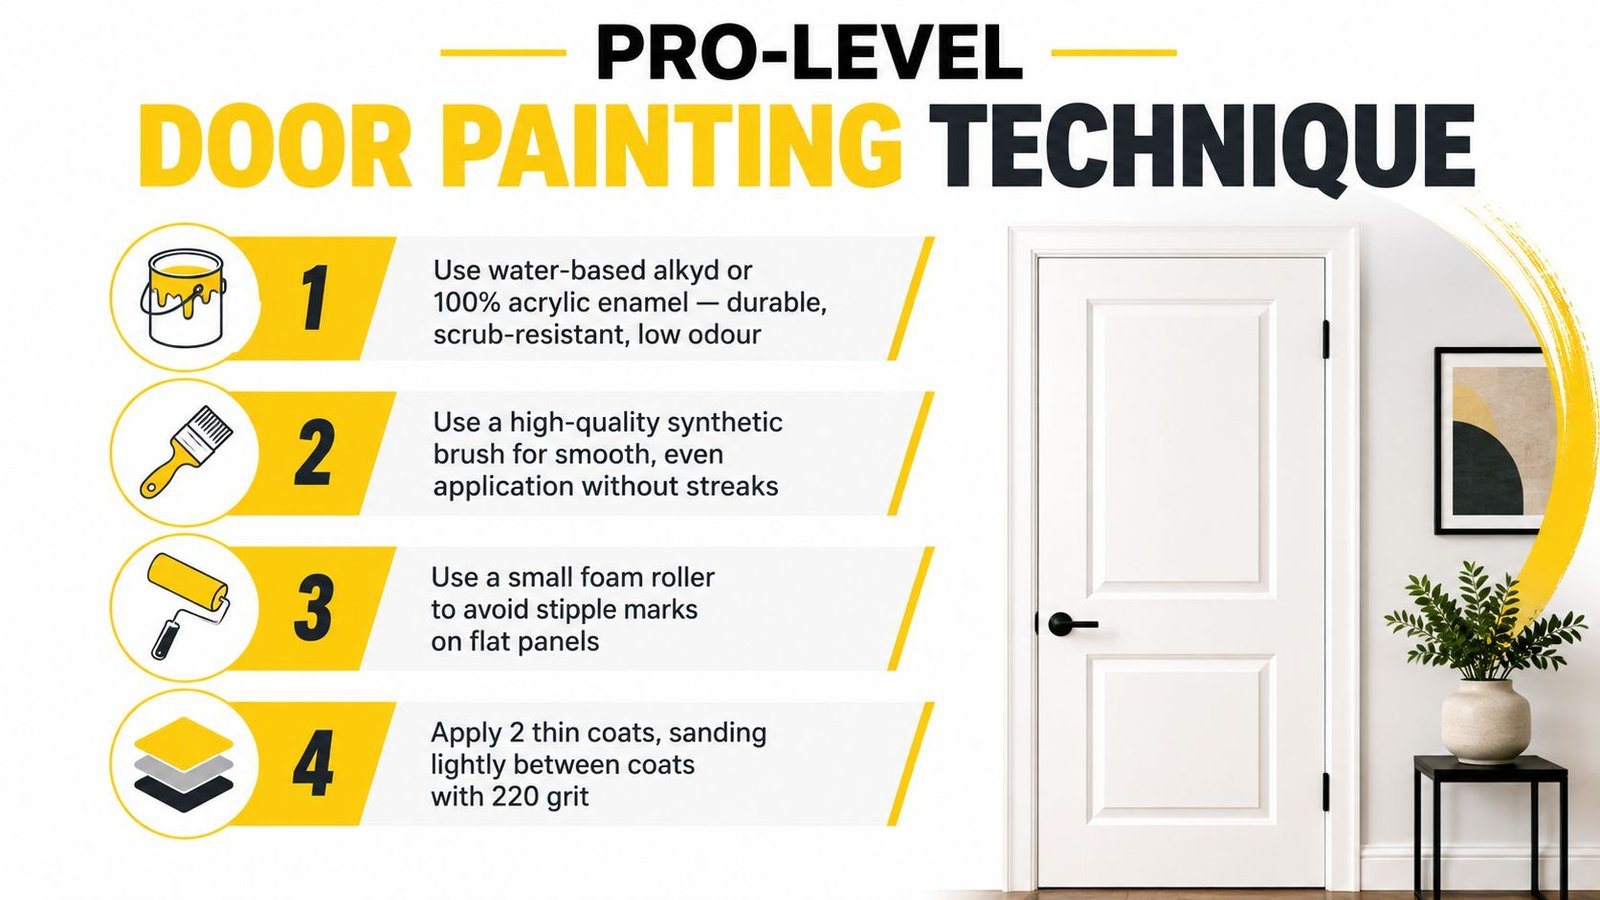
Interior doors take hand contact, cleaning, and repeated movement, so standard wall paint is a poor choice. Use a water-based alkyd or 100% acrylic enamel for a harder, more furniture-like finish and less odour than many traditional solvent systems. The product data sheet should set expectations for drying, recoating, and handling.
Match sheen to both the room and the quality of the preparation. Satin gives most homes a softer appearance and disguises minor preparation marks more effectively. Semi-gloss cleans more easily and suits doors near kitchens, bathrooms, entries, and busy corridors. Gloss creates a sharper modern effect, but it exposes sanding scratches and uneven filler edges.
Canadian colour guidance points toward warmer whites, beige and tan, muted greens, and earthy tones. Interior doors are increasingly used as richer neutral accents instead of being automatically painted white (Canadian interior door colour and design guidance). Dark and warm colours can work well, though they require consistent preparation because fingerprints, edge burnishing, and touch-up differences are easier to see. For rental properties, these paint color tips for rentals help balance tenant appeal with practical maintenance.
Use a different order for slabs and panels
A flat slab responds well to a 10 to 13 mm microfibre roller. Apply long, overlapping strokes in one direction, then back-roll lightly while the film remains wet. A small foam roller can leave less texture, but controlled pressure and a thin coat still matter. For a detailed comparison of application methods, see our guide to spray painting versus brush painting differences.
Paneled doors need a set sequence. Cut the mouldings with a 50 to 65 mm angled sash brush, roll the recessed panel faces, then paint the rails and stiles. Maintain a wet edge. Once the coating starts to set, stop brushing it, because late passes create drag marks and visible texture.
Water-based door enamel may feel dry quickly, but that does not mean it can handle rough use. Canadian specifications give examples of 2 to 4 hours to touch and 4 hours to recoat, while another satin cabinet and trim enamel lists 1 hour dry-to-touch and 2 hours to recoat (Canadian enamel technical data sheet). Follow the exact product schedule and allow longer for full curing. Avoid slamming or tightly closing the door before the film hardens, or adjoining surfaces may block and imprint.
A Valspar cabinet, door, and trim enamel technical sheet notes compliance with Canadian VOC limits and identifies a benchmark of under 150 g/L for that product category (Valspar Canadian product information). Choose the coating with the finish, substrate, ventilation, and compliance requirements considered together.
Common Mistakes to Avoid and When to Call a Pro
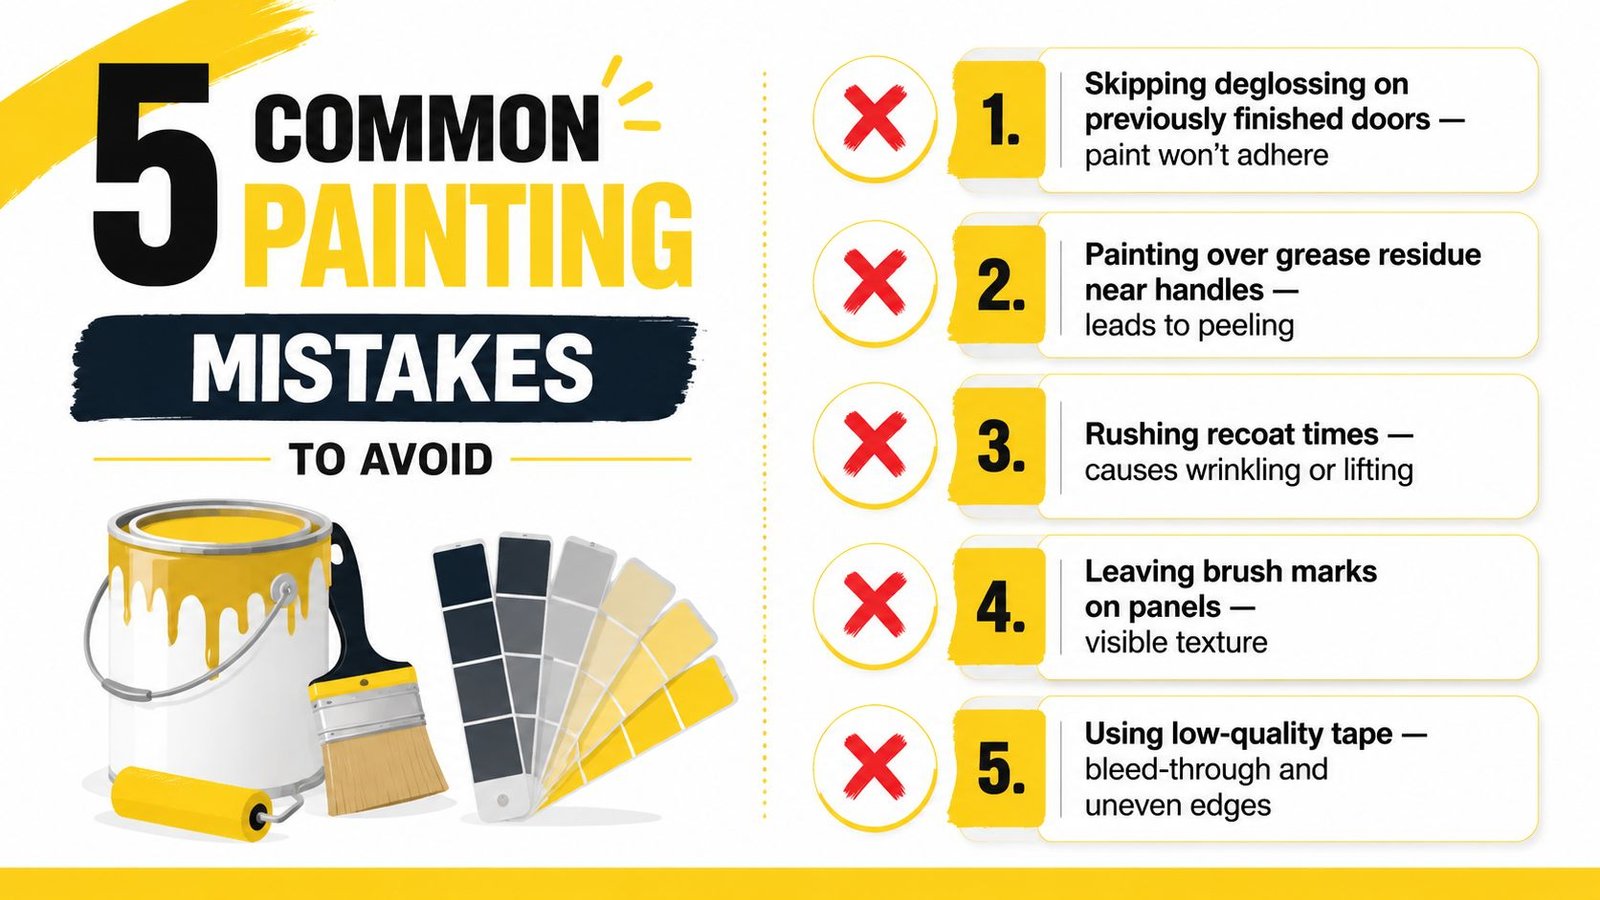
Most failed door jobs don't fail because the painter chose the wrong colour. They fail because the painter left gloss intact, painted over grease, applied too much material, or closed the door before the coating had formed a durable film.
Watch for these finish killers
- Skipping deglossing: New paint struggles to grip a slick, previously finished surface.
- Leaving handle residue: Oils near the knob can cause fisheyes, peeling, and uneven adhesion.
- Rushing the recoat: A second layer applied over soft paint can wrinkle or lift.
- Overworking panel mouldings: Repeated brush passes leave visible ridges and lap marks.
- Choosing the wrong sheen: High sheen makes imperfect repairs more obvious, while a low-durability wall finish may scuff in busy areas.
DIY can work for one sound slab when the owner has a clean work area and enough time to respect the drying schedule. Professional work becomes more practical when several doors need consistent colour, when the home must remain occupied, or when the finish involves lacquer, veneer, water damage, or a hollow-core door with multiple peeling layers.
A Toronto, Vaughan, North York, or King City project may also include frames, casing, stairs, cabinets, or several rooms. Soca Services Painting handles interior painting work where door preparation and finishing need to match the surrounding home painting, wall colours, and trim system.
Complete the job carefully
Wait 24 hours before rehanging hardware unless the coating manufacturer specifies otherwise. Avoid placing tape on a newly finished surface, and inspect the door under raking light, which reveals missed edges, roller texture, and shallow filler scratches that normal room lighting hides.
The finished door should open freely, close without sticking, and show an even sheen from every angle. If the slab needs structural repair, specialty adhesion control, or a consistent finish across multiple rooms, request a written estimate before starting.
Contact Soca Services Painting for interior door preparation, priming, enamel application, and coordinated painting in Toronto, Vaughan, North York, and King City. You can request a free estimate for a single door, a full set of interior doors, or a broader home or commercial painting project where durability and finish consistency matter.